
Arduino/Android 4 Zone Speaker Selector
Here’s my write-up of an Arduino project that will enable speaker zone switching across your home WiFi network from your Android smartphone. A networked 4-zone speaker setup using Android as a remote control. Here are the instructions and code you need to do it too!
Watch the demo to see if it’ll do what you need (Youtube)
Speaker Selector – Overview
In theory, we have an impedance protector that is switched via relay rather than giant buttons. The relays are controlled by our smartphone, which is hitting the Arduino server. Simple!
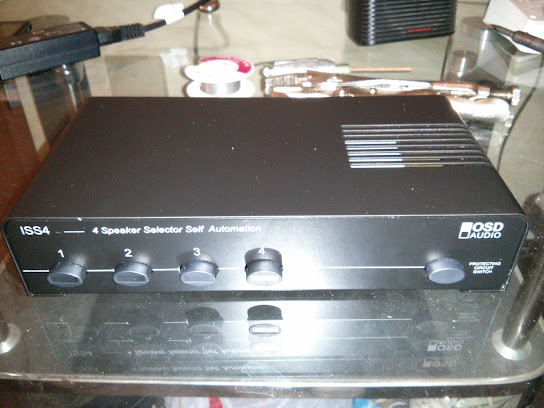
This provides the 4 big resistors to add 4 speaker zones to your powered second zone (or first zone, even). The watts delivered to a speaker varies based on how many speakers you have turned on, because there are resistors that get turned on/off to keep your receiver/amplifier from frying (impedance protection). I’m starting to question whether I should have gone with 8 zones!
Update 4/30/2015: This 4 zone device has been working great under pretty consistent use for well over a year now.
Parts List:
- Speaker Selector –
OSD ISS4 4, 6, or 8-Zone Speaker Selector with Impedance Protection on Amazon - Arduino Relays –
SainSmart 8-Channel 5V Relay Module on Amazon - Arduino –
Arduino UNO R3 on Amazon - Arduino Ethernet Shield –
Arduino Ethernet Shield R3 on Amazon
Making the speaker selector work over the Internet
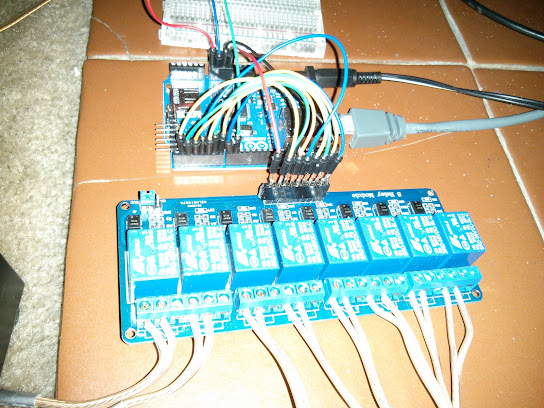
The Sainsmart relay module is great… it really simplifies the construction of this whole thing. It is marketed as being Arduino compatible, but really anything with low voltage driver output would work, and it really speeds up connecting the relays.
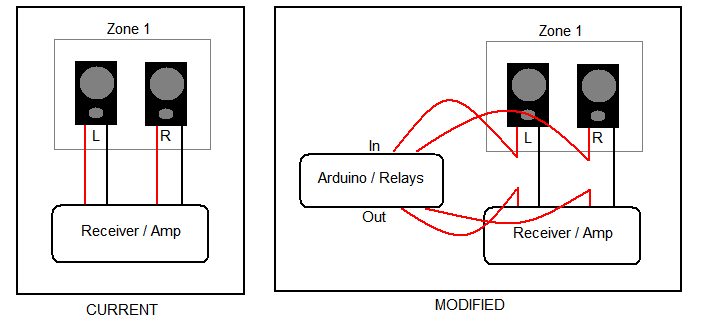
For four zones, it turns out you need 8 relays (4 left speakers & 4 right speakers). Soldering is no longer the suggested method to implement this, just clever wiring in order to put the relays in the middle of each speaker circuit. You’ll want to route the positive wire for each speaker through the relays, and no changes to the negative are needed.
Here is my original version (solder-method) all hooked up:
And the whole system:
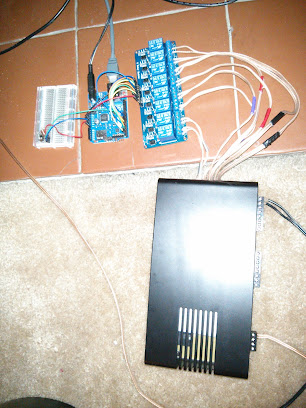
(The breadboard just has a 315MHz transmitter, see my last blog post to find out why. The entire breadboard is completely optional for this project.)
I added the code to my Arduino webserver, which will handle requests at /speakerStatus to see which are active, and /speaker?zone=&state=<0/1> to turn a zone on/off.
Speaking of the Arduino, I used the Ethernet model rather than buying an Ethernet shield separately. I couldn’t find anyone still selling that, so I linked to the Arduino Uno and the Ethernet shield.
Take a look at the Arduino server code on Bitbucket here!
Android App Speaker Selector
Along with all that, there is a great Android/IPhone app that will request those URLs for you with toggle buttons. Code for that is also in the above repo. In addition to the basic functionality – querying status and updating the zones, a long-press on a button will allow you to rename any zone, remove unused zones, etc. See more about that here.
Modernizing the audio receiver
To complete my houses audio setup, I bought a web-enabled receiver for my Pandora/Spotify playing. I timed it right and got a good deal on an end-of run of 2012 model for this receiver… this is the current version: Onkyo TX-NR535 5.2-Channel Network A/V Receiver
Of course it comes with an Android/iPhone app for remote control, to make this entire system complete! I’d say that Onkyo’s app for Android is pretty good, with a nice selection of internet radio options, Spotify being the one that sold it for me.
Bottom line… I can be in the basement and turn on my workout music without running upstairs to change any settings.
Hi Stephen,
Nice article. I was thinking of doing something similar but I also want to control the volume. What do you think? Is that easy to do?
I’m using a relay – probably possible with other components but honestly I am basically beginner level and just had a problem I wanted solved. I bet there is a variable resistor where the resistance could be controlled with the arduino. But then your problem is that the multi-zone selector also uses resistors for impedance matching… that protects your receiver/amp/speakers from damage.
This is actually a good point. My outside speakers, just by whatever speaker design, come on much quieter than the kitchen speakers… so can really only have one or the other on at the same time.
Hi, this is great – exactly what I am looking for. I’m completely new to Arduino and pretty new to electronics in general so any advice or tips and tricks you can provide would be appreciated.
My main question is around controlling this on an iPhone – I note you’re using an Android, but can this be controlled via the web or perhaps an iPhone app do you know?
Thanks in advance!
This is a great idea and looks like it is very affordable. I can’t locate the Arduino Ethernet board. Everything I see has a USB port. Can you tell me what board you used?
Could you make the control interface via a web app so that we iOS users could partake of such genius
Or better yet incorporate the design into a platform available across the Android/iOS divide like touchOSC…It allows for “prettier” design.
That could apply to the outlet controller as well.
Great work.
Thanks for posting this, it’s exactly what I’ve been looking for. Would you mind sharing a picture of the connections inside the ISS4 speaker switch box?
Just dropped a new picture of the inside of the speaker selector into the article.
C2 Left and C2 Right will be connected through the relay. I used speaker cable also, for that connection.
So each zone needs 2 relays. When both relays for a zone are “ON”, the output of the speaker selector for that zone will be live, even if the button is not pressed.
Hope it helps… Let me know when you’ve got it all working!
Over a year later, and I’m finally getting around to putting this together. I bought all the parts last year, and I’m actually glad I didn’t start. The alternate wiring idea seems much easier and no hacking on the speaker selector itself. Amazon is delivering a small project box on Tuesday, so I can put the Arduino and relay in it and make look nice and neat in my stereo cabinet.
Your new android app is also quite nice, much better than the original code I’d downloaded last year. Thanks!
Actually, I can’t seem to make the Android app work. It can’t seem to figure out the wifi connection and never sends commands to the Arduino. I’m not up enough on phonegap to debug, and really, I think a simple web page served from the arduino itself with a few buttons would be sufficient.
Got it completed and installed today. Works great! I posted some details here:
http://danson.grafidog.com/2015/05/arduino-speaker-controller.html
Thanks for the inspiration and advice!
Stephen,
Great system.
I have been keeping an eye out for anyone else that has come up with this kind of system for several years now and your are basically the only person I have seen post anything about it on the web. I have seen where several people have asked if they exist but no one else has really created one.
I created one similar several years ago using a control by web relay (controlbyweb.com) attached to my 6 channel speaker selector. I use a Sonos (Sonos.com) and an amplifier for my 6 channel whole home system. That way I can control the volume and music with the Sonos and change which room the speakers play in through the web relay and my iphone. The relay has a web server built-in.
I cant believe this hasn’t hit the market from a large company yet. It is such a great way to control music and change speakers in a house wirelessly.
I tried to patent it in early 2011 but the company that did the patent search said a remote control speaker selector already existed so I didn’t pursue it any further. I don’t believe what they found actually covers this so I will eventually try again.
Unfortunately I dismantled mine when I added another amplifier and 6 more channels and now use the relay to control the gates at the end of my driveway. Seeing your system has sparked my interest again and I will probably put it back together soon.
Thanks for the motivation.
Great Blog and Speaker Selector. Keep up the good work.
Jay
Thanks for the comments, I thought about moving this to a space like Kickstarter but I’m not sure it’s the right time.
I think in order to work something like this commercially and end up with a profit, you end up at a price-point similar to Sonos and it still requires a lot of labor of all the wiring, which makes it infeasible for temporary installs and non-technical buyers. So if this project is useful primarily for home owners, and if you aren’t a hobbyist… they’ll probably choose a wireless and distributed solution like Sonos for a premium, or maybe a Bluetooth speaker, which would in fact be cheaper, and they just move it where they want it. Young people who may be more interested in the mobile controls will probably not go through the hassle of wiring up a whole house or apartment and choose a portable speaker solution instead.
I’m just not sure if there would be enough demand to make the problem of scaling it up to production quality worth solving.
But that’s why I documented this, I like seeing hobbyists get value and entertainment out of it, rather than choose to hold it back until the market may or may not be more sensitive to it.
Hi Stephen,
I have just come across this page while searching for a way to control my speaker selector via an android phone. It seems to cover the bases i was hoping for so now will start doing my research. Thanks for the ideas and info.
Have thought of something that would save the soldering part.
If you ran the speaker cables from the amp to the speaker selector like normal. then connect right spk positive cable direct to speaker, but with the negative cable, run it from selector output to the relay/contactor, then out of relay to the negative on the speaker? Then the same with all other speakers. Therefore, until relay is switched, there isn’t a complete circuit to the speaker? The only thing would be to always have the speaker selector switch to ON for all speakers. Any issues you could see doing it this way?
Also, if I go ahead with trying this, would you mind giving me a little help with programming the arduino. I currently using Ubuntu and understand basic editing of scripts/commands/files.
Yes, this would absolutely work. Can’t believe I didn’t think of that. If you have your hammer in hand, you don’t see the screws you’re pounding, I guess.
It might complicate the wiring, since the source would be the relay and the selector for each speaker, but I’m sure there is a way to arrange everything and zip tie it in place. This definitely makes the project more approachable. I think I might do an upgrade to a larger zone selector sooner rather than later, and also update the blog with the revised wiring approach.
I can try to support you somewhat on the implementation of the code. I’m not sure if using the Ethernet shield is different from the Arduino Ethernet which I got. I imagine it should be straightforward, if you’ve done some of the basic Arduino tutorials and can push the code with no issues. Everything in Bitbucket is in working order.
was thinking of getting the Arduino Ethernet, think it only comes with PoE now. I will try some of the tutorials.
Yeah the wiring would be a tad more complicated. But nothing a few cable ties can’t help with, plus in my instance it would be out of normal sight.
Stephen
great idea and tutorial! Question – if I wire it like the fellow above suggested re taking the negatives from the selector into the relays, do I still need 8 relays? Or can the 2 negatives from a speaker pair use a single relay? I am not an electronics guy so sorry if this is a simple question.
Thanks!
Hi Ken-
Thanks for the feedback. Every speaker will need its own relay. I would definitely recommend the alternate wiring approach rather than the older soldering approach. Superior hands-down.
Let me know how it goes!
Stephen
[…] To add sounds to our installation we will use an adafruit wave shield. This is a kit that needs to be soldered. For budgetary reasons we will only use one shield, this has as a result that both players will hear the same sound, we can’t send a different sound to the two speakers. To solve this problem we will use a relais (an example can be found here). […]
Can this work for more than 4 zones or is that the limit?
There are impedance protectors with 8 zones and would need 16 relays with the same approach. There are probably better options around these days, I believe somewhere I linked to one that’s natively wifi enabled.
Maybe I missed this in your post but doesn’t this approach requires that all the buttons on your selector be constantly in the on position?
Have you considered using the relays to bridge the switches on the speaker selector? This way you would only need four relays instead of 8.
Also you would still be able to use the buttons to turn channels on and off independent of the relays
I never used the physical buttons but me having done it wrong wouldn’t surprise me. In fact there is a no-solder approach I learned about from another comment on this blog. Perhaps others who have made this have done it like this, having learned from my inexperience!
I have just come across this and despite this article starting back into Jan 2013 trying to find a commercial speaker switch that can be controlled by an app on a wireless network is next to impossible.
I can buy switches from Amazon that will control my lights, my heating and about everything else in the home but not about a wireless DLA speaker switch.
I have a house with speakers and Sonos in nearly every room but each room requires an individual Sonos at £499 for each room. it was designed around 7 zones.
3 of my units have now died out of warranty and no-one even Sonos wants to repair them so even if such a switch cost £300+ I could see a commercial market for such a product.
In the meantime I will use your design to build my own unit with help from friends.
Thanks for sharing your design and the others that have suggested improvements.
If Head Up Displays for cars can be successful through the likes of Kickstarter then this idea certainly has value.
Stephen,
Could you share the code for the speaker selector? could not find it in your links.
Thanks so much!
Hi, thanks for commenting! The arduino code is all up on BitBucket. It’s under the OutletWebControl directory, even though it says outlet, it’s both. Speaker code is just in the OutletWebControl.ino file, it’s much less code than the outlet control code because it was hard-wired to the arduino and each of the digital pin controls a relay. Good luck!